Trignometry: Trignometry is a branch of Geometry that deals exclusively with triangles. You may wonder how come triangles have a whole branch of Mathematics dedicated to itself !! There are lots of things that's possible with triangles, and knowing triangles well forms the basis of Geometry.

We learned about drawing various triangles, finding angles of a triangles, and sides of a right angle triangle.

We can find all sides of a triangle given it's angles or vice versa. We need to know sine, cosine and tangent for that. We'll learn about right angle triangles and then move to other generic triangles.

Radians: So, far we learned that unit of angle is degrees. That is what our protractor also shows. One other unit of angle is radian. It's very widely used in scientific community, because many ratios cancel out nicely when using radian. 180 degrees is defined as π (pi=3.14) radians.

So 1 radian = 180/π degrees (approx 57.3 degrees). So, 1 radian of angle is an angle which is slightly less than 60 degrees.

Right angle Triangle:

For a right angle triangle with any one of the angles as Θ, we will have ratios of all 3 sides of triangle fixed, i.e if we make any other right angle triangle with this angle, that triangle will be similar to this triangle. Infact all such triangles will have same shape, they will just differ in the scaling. it makes sense to define the ratio of the sides for all right angled triangles for a given angle Θ on it's base.

Consider right angle triangle with sides a,b,c, where a=vertical side, b=base, c=hypotenuse, and angle Θ = angle b/w hypotenuse and base. Then we have six ratios that we can define between the 3 sides. Below we define those six ratios.

sin(Θ) = a/c  cosec(Θ) = 1/sin(Θ)  = c/a (aka cosecant)
cos(Θ) = b/c sec(Θ)    = 1/cos(Θ)  = c/b (aka secant) => cos was already used up, so putting co again sounds weird cocosecant, so we stick with secant
tan(Θ) = a/b cot(Θ)    = 1/tan(Θ)  = b/a (aka cotangent)

This is the definition for all 6 ratios. Sine, cosine and tangent are the ones most commonly used. There are tables that give values of sine, cosine and tangent for all values of angle Θ, from 0 degrees to 90 degrees. By looking at the table, we can figure out lengths or angles for any given triangle.

Few basics of terms above:

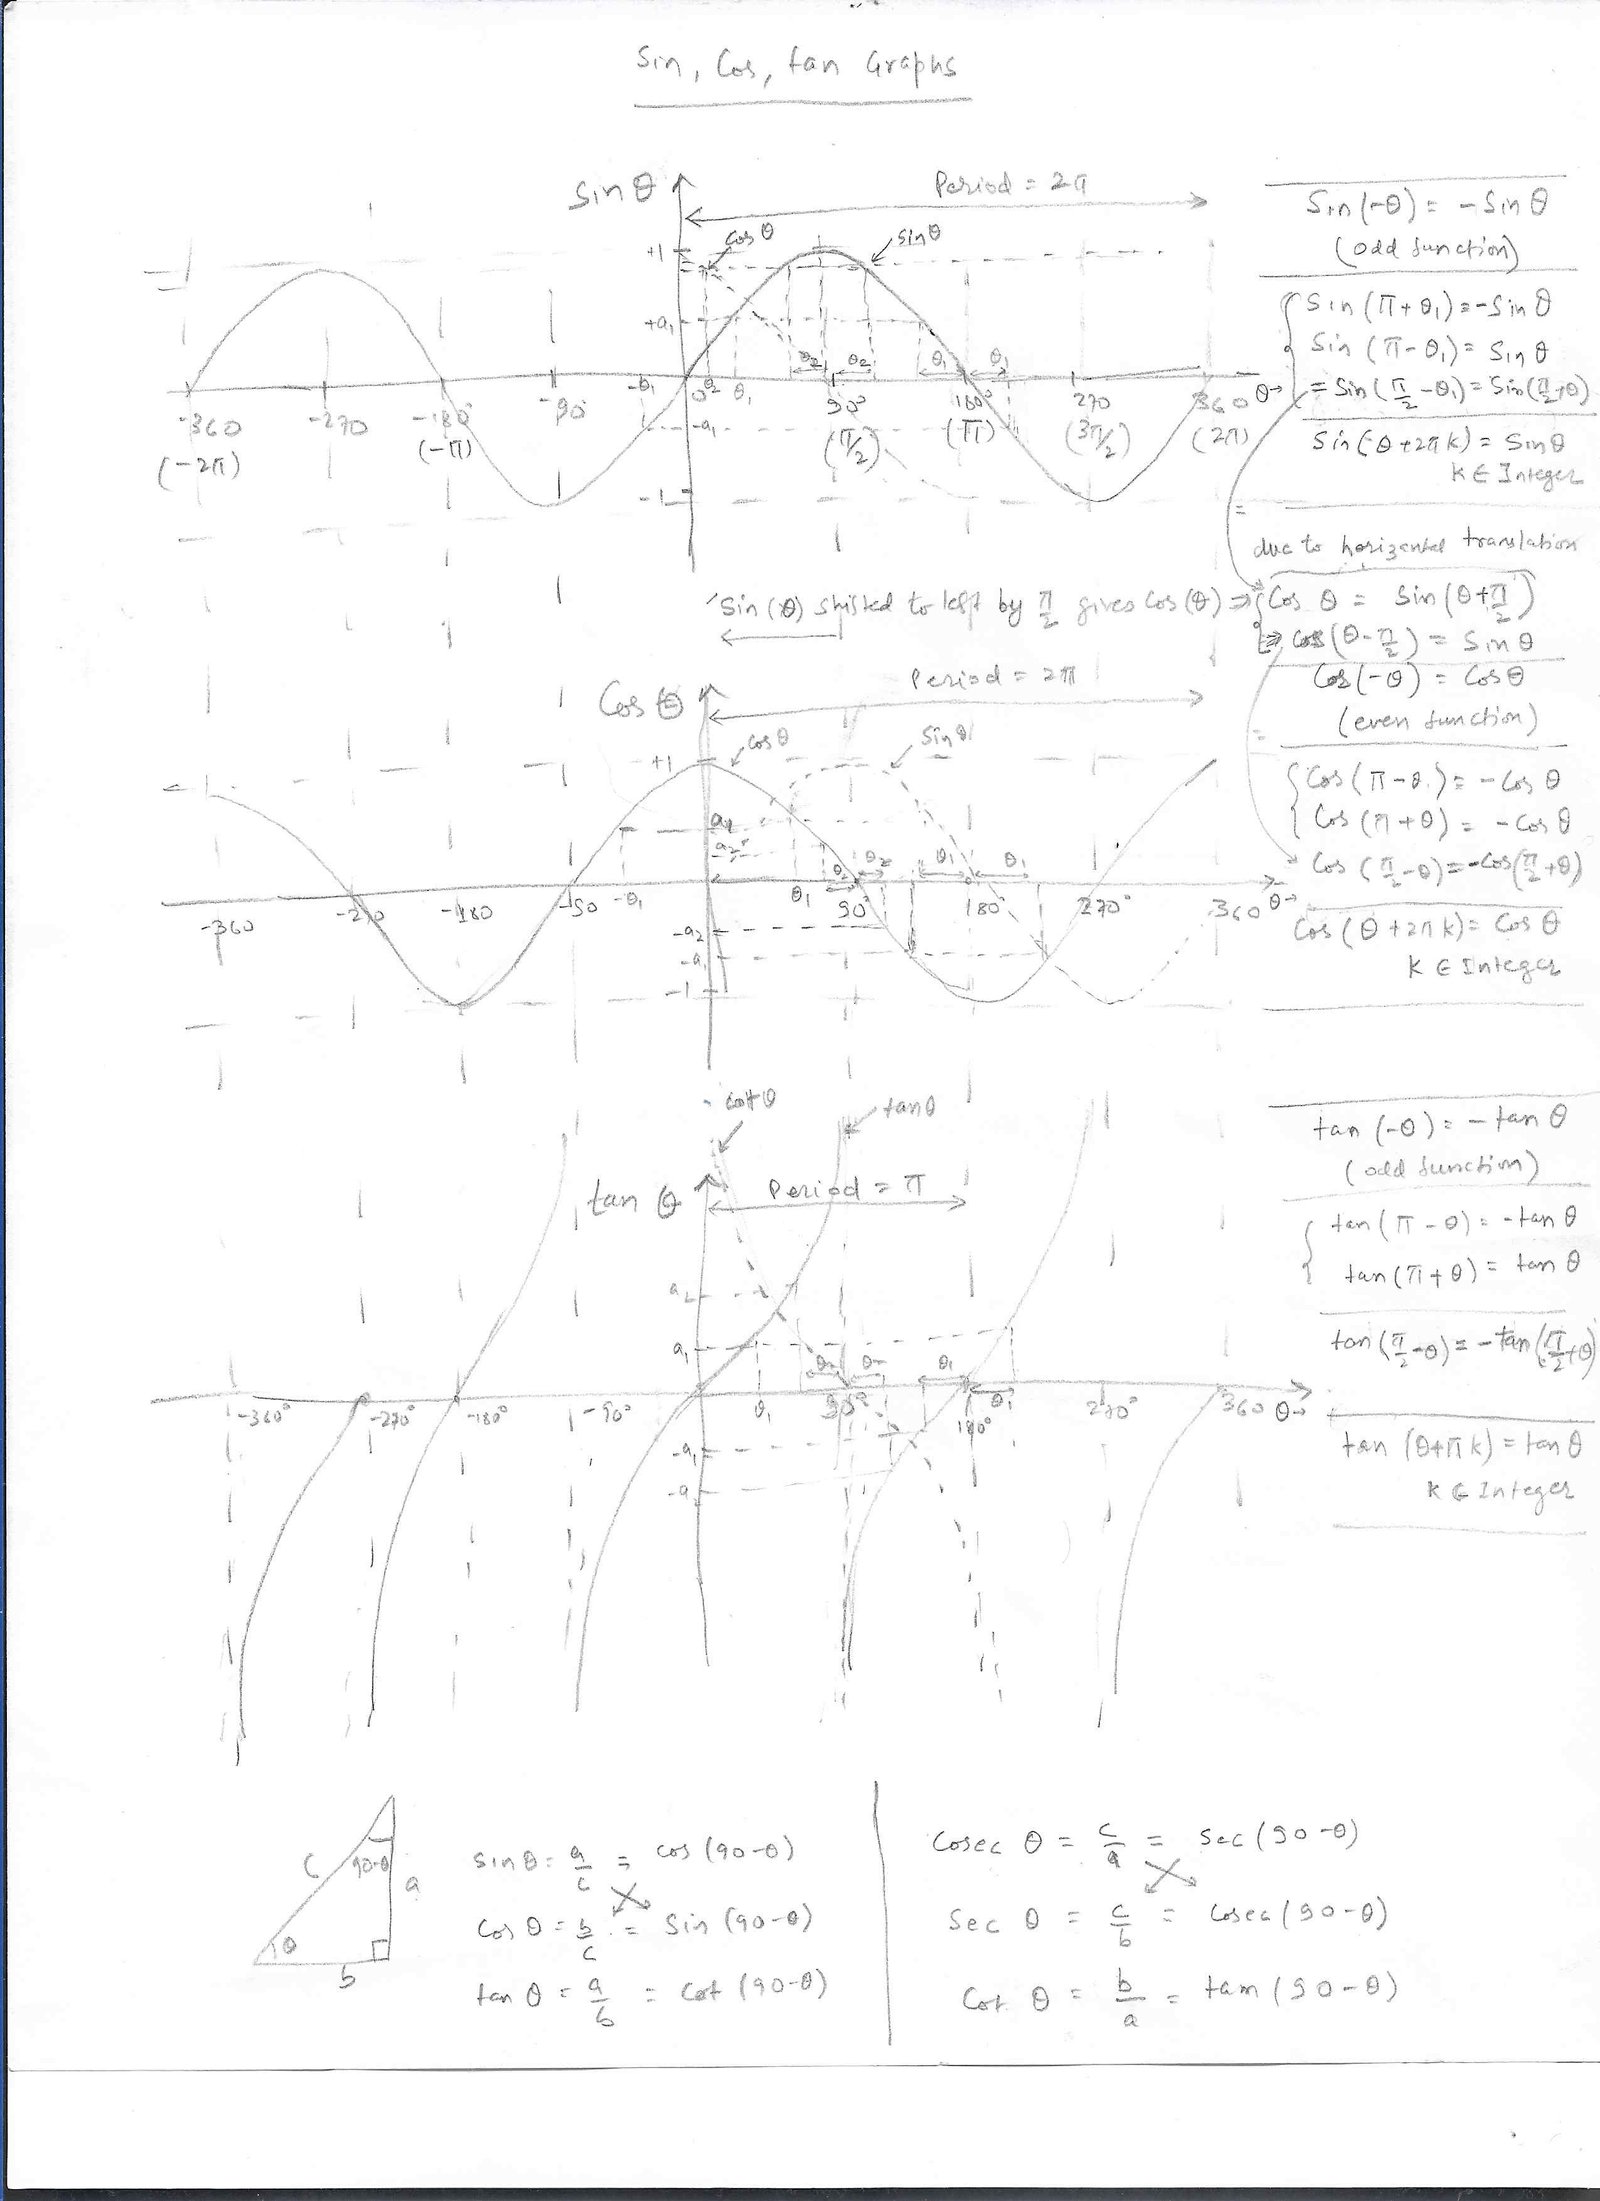
  • All 6 of the ratios are periodic. Sin/cos are periodic with period of 2π (360 degrees), while tan has a period of π (180 degrees).
  • Sin, cos are continuous while tan becomes discontinuous at any odd multiple of π/2 (90 degrees, 270 degrees, etc).
  • Cosine is just a shifted version of Sine, where the Sine function is shifted to the left by 90 degrees to form cosine

I've put the most common theorems for these 6 defn, and their relationship at 90, 180 and 360 degrees. It's easy to see these relations from the graph itself, or by using the formula defn of the  triangle

Link => SIN/COS/TAN waveforms and equations

There are lot of theorems that can be derived for these 3 equations defined above. Lot more theorems are on link below.

  1. sin2(Θ) + cos2(Θ) = 1 (This can be proved by Pythagaros therem: (a/c)^2 + (b/c)^2 = (a^2+b^2)/c^2 = c^2/c^2 = 1). Most IMP formula, one you can't afford to forget.
  2. sin(Θ)/cos(Θ) = tan(Θ) (this can be proved by dividing sin and cos eqn above)
  3. sin(Θ) = cos(90-Θ). Similarly cosΘ) = sin(90-Θ). This can be proved by looking at the right triangle, and finding sine and cosine for the other angle which is (90-Θ). OR by noting that cosine is a 90 degree left shifted version of sine. See link above.
  4. 360+Θ is same angle as Θ, as 360 is one full rotation and comes back to starting line. So, is 360*n+Θ where n is an integer number. So, all 6 definitions above give same result for 360+Θ, i.e Sin(360*n+Θ)=Sin(Θ), where n is an integer (+ve or -ve)
  5. For all other angles between 0 to 360 clockwise (treated as +ve), above equations are defined depending on whether base and height are +ve or -ve. Hypotenuse is always taken as +ve. Height and base are taken as +ve or -ve depending on X and Y coordinate. Similarly for angles going anticlockwise, we treat those angles as -ve, and again define all equations above the same way. These equations are defined in this way, so that the same sin, cos, tan eqn will work in all quadrants.
  6. Many more formulas, and definition for angles > 90 degrees and < 0 degrees are in "unit circle" link below: 
    1. One other imp formula is sum of angles: Sin(a+b) = Sin(a).Cos(b) + Cos(a).Sin(b). This can be used to derive Sin(a-b), Cos and tan sum/diff formula ver easily. This is harder to prove. One such proof is on Khan
    2. Academy => https://www.youtube.com/watch?v=R0EQg9vgbQw
  7. Cheat sheet for imp formulas => trig_cheat_sheet.pdf

So, we see that all 3 definitions above for sine, cosine and tangent are related to each other. If we know any one of the sine, cosine or tangent we can know the other 2 easily.

Unit Circle: We can also use a unit circle to learn these ratios. There is a unit circle that can be drawn. Then sin, cos, tan etc are just sides of that triangle inside and outside the circle.

Explained on this link: https://www.math10.com/en/algebra/sin-cos-tan-cot.html


Graphs of transformation of sin/cos functions:

So far we saw drawing Sin/Cos functions. However if we transform the eqn to be more generic like y = A*sin(B*x-C) + D, then sin/cos func is compressed/expanded + shifted up/down or left/right. It's similar to transformation of any function that we saw in earlier section. When f(x) gets transformed to A*f(B*x-C) + D, func shifts as well as get compressed/expanded. Exactly the same thing here with sin/cos. Below link explains well.

Link => https://math.libretexts.org/Courses/Rio_Hondo/Math_175%3A_Plane_Trigonometry/02%3A_Graphing_Trigonometric_Functions/2.04%3A_Transformations_Sine_and_Cosine_Functions


Inverse functions:

So far we saw drawing Sin/Cos functions. We have inverse functions for any given function.For ex, the inverse of square function is square root function, etc. For sin/cos/tan etc, the direct function converts from angle to a number. The inverse function gives us the angle back from that number. So, the domain of inverse function is from -1 to +1 and range is from -∞ to +∞. However since the forward function is periodic, the reverse func will give us multiple values of Θ for a given number. That violates the defn of func, which states that there can be a max of 1 Y value for a given x. To make it fit, we choose a range for inverse function so that none of the Y values are repeated. We define our inverse function only in this range. That's how officially inverse func for sin/cos/tan etc are defined.

Link => https://math.libretexts.org/Courses/Monroe_Community_College/MTH_165_College_Algebra_MTH_175_Precalculus/06%3A_Analytic_Trigonometry/6.01%3A_Inverse_Trigonometric_Functions


Drawing Right angled triangles:

It's important that kids draw right angled triangles. Then they should be able to figure out by themselves if they can draw a unique right angled triangle for a given angle. Following are cases where info is enough to draw a unique right angles triangle.

  • Given Any 2 sides of right angles triangle => Pythogaros Thm gives us 3rd side, and all 3 sides (SSS) gives us unique triangle
  • Given any one angle and one side of right angled triangle => Since 1 angle (X) is given, we can find out other angle (90-X). So, all 3 angles are known, and 1 side is known, so unique triangle can be drawn using ASA.

Ex: Draw a right angled triangle, with one angle=30 degrees. You can draw bunch of such triangles since length of any of the sides is not given. However, all these triangles are going to be congruent or similar to each other. Also, make sure the kids realize that the sides seem to have a fixed ratio to each other for a given angle. Make them find sine, cosine and tangent by measuring the lengths a, b, c and finding the ratios.

Ex: Repeat the exercise above with the other angle of the right angled triangle = 45 degrees. Again make the kid find out sine, cosine and tangent by measuring

Now, instead of drawing, let's try to find sine, cosine and tangent for special angles = 30, 45, 60. For angle=45, it's easy as the 2 sides are going to be the same (3rd side can be computed via pythagoras  theorem), so ratios can be computed easily. For angle=30, we can make a reflection of the triangle, so that the 2 triangles combined become an equilateral triangle. Or we can draw an equilateral triangle and cut it in half. So, each half becomes a right angled triangle and the 2 halves are equivalent triangles, so, base is divided in half. Height can be found out by employing pythagoras  theorem (h^2=a^2 - (a/2)^2 => h = √3/2*a.

For 0 degrees, the height of triangle is reduced to 0, so hypotenuse is equal to base. That gives us the values for 0. For 90 degrees, the base of triangle is reduced to 0, so hypotenuse is equal to height. That gives us the values for 90 degrees.

So, now we know to compute these for these important angles:

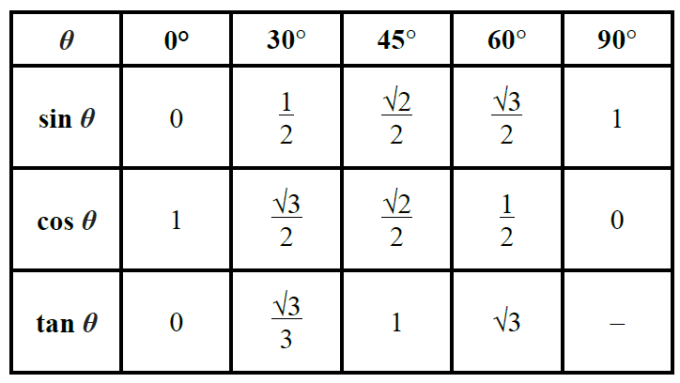
The easiest way to remember the basic values of sin and cos at the angles of 0°, 30°, 60°, 90°: sin([0, 30, 45, 60, 90]) = cos([90, 60, 45, 30, 0]) = sqrt([0, 1, 2, 3, 4]/4) 

We can use the trignometric identities discussed earlier to get sin, cos, tan for 15 degrees and 75 degrees too.

  • 15 degrees: Use Sin(A-B)=Sin(A).Cos(B)+Cos(A).Sin(B) => Sin(15)=Sin(45-30)=Sin(45).Cos(30)+Sin(30).Cos(45)=√2/2*√3/2+1/2*√2/2 = √2/4*(√3-1)
  • 75 degrees: Use Sin(A+B)=Sin(A).Cos(B)+Cos(A).Sin(B) => Sin(75)=Sin(45+30)=Sin(45).Cos(30)+Sin(30).Cos(45)=√2/2*√3/2+1/2*√2/2 = √2/4*(√3+1)

There are trignometric tables provided which lists sin, cos, tan for all angles between 0 deg to 90 deg. These tables are very useful to find out sides or angles of a right triangle.


Car Tire Change

You should always know how to change the tire of your car, when it goes flat. Most of the people have never changed tire in their life. So, when they get stranded, they have no idea of how to change one. Internet is of course not reaching there, so you are out of luck. Don't be that guy.

Find out where the tire changing equipment and the spare tire is for your car. Usually tire changing equipment is in the trunk of your car, under some hidden box, while tire is also in the trunk. Sometimes spare tire is put in the bottom of the car, when there's not enough space to put it inside the car. Watch a video on youtube on exactly how to change the tire for your car. Then practice it once on your car on one of the tires.You will thank yourself later.

Below is a video on changing tire on Toyota Sienna Minivan: https://www.youtube.com/watch?v=mvC0SrMZ4l0

Do the same for your car. This is a generic tire changing video: https://www.youtube.com/watch?v=0KDMdYww4VE

Happy Driving !!


World Assets

This article goes over all the assets in the world and the ownership of those assets.

ASSETS

sifma.org is a very good resource for global capital market. Link for assets per year: https://www.sifma.org/resources/research/fact-book/

You can also find a pdf on the right side that has lots of detail for each year.

Total assets in the world may be found out by adding up the price of all assets in the world. It's hard to find data for the world, but USA data is readily available. 

World Assets as of FY 2024:

  • World stock market => ~$130T ($65T in USA). Assume most of it is owned by individuals, or finally goes to the individuals (i.e Pension funds, etc). About $0.5T of new equity is issued in the market every year (Not sure, if this euquity issuance includes only the money that was collected from investors, or if it accounts for the total market cap of the new company issuing stocks, most likely it includes only the money that was raised from investors by issuing stocks).
  • World housing market => No matter which country house prices everywhere are soaring due to cheap money supply. In US, total residential Housing asset is ~$45T (as of 2023), so we may guess that global housing market may be close to stock market valuation. So, about $100T in housing asset (minus the amount of mortgage loan, but that will be paid off eventually. It might be around 20% or $20T in housing loans globally. US mortgage loans are at $13T)
  • Fixed income (FI) market => This comprises of bonds, debt issued by companies, govt, etc that people buy as debt securities. This market is $145T of which $60T is USA market. This market comprises all the debt securities outstanding as of that year, Roughly 20% of these fixed income securities are paid off or rotated again as new securities. About $25T of new fixed income securities are issued each year (as lot of them mature within 5 yrs, I guess) . As we can see "fixed income security" market is bigger than "equity market", though the gap is closing fast, as equity market goes up by 10%/yr, while bond market is going up by 5%/yr.
    • In 2009, global equity market was $50T, while FI market was $75T. As of 2024, global equity market was $130T, while FI market was $145T.
  • Cryptocurrency => These have added $2T or so to world assets as combined market cap is ~$2T as of 2024. Top 5 cryptocurrency comprise 80% of the market. They are all traded on stock exchanges just like stocks.
    • Bitcoin (BTC) = $1.2T or about 55% of market,
    • Ethereum (ETH) => $0.3T or about 15% of market,
    • Tether USDt (USDT) @$115B, BNB (BNB) @80B and Solana (SOL) @60B comprise next 12%
  • Precious metals => These include gold, silver, etc. Prices have been rising fast as of 2024-2025. Gold prices are usually 50X-100X of silver prices, for no particular reason. Silver is more abundant than gold (About 10X more silver than gold). As can be seen, total market cap of precious metals is dominated by Gold and silver.
    • Gold => Assuming 200K ton of Gold exist in the world, and price of $4K/oz (as of 2025), the total mkt cap is ~$30T.
    • Silver => Assuming 1800K ton of silver exist in the world, and price of $50/oz (as of 2025), the total mkt cap is ~$3T.
    • Platinum => As of 2025 with price of Platinum = 1.5K/oz, total mkt cap is $0.4T
    • Palladium =>  As of 2025 with price price of Palladium = 1.5K/oz, total mkt cap is $0.25T


USA household asset numbers are much more reliable, as they come from FED, collected via surveys and other genuine resources. 

Fed Link for Q4, 2024 for household assets => https://fred.stlouisfed.org/release/tables?rid=52&eid=810420&od=2024-10-01#

You can look for any year by changing the year and Qtr in the above FED link.

USA household Assets as of FY 2024:

  • Total Assets =$180T (as reported by Fred data). However, on adding below numbers, it comes to $200T.
  • Financial assets = $72T 
    • Stock market (all equities, mutual funds (MF)) => $50T. Here equity market is $40T, and Mutual Funds is $12T. Ideally, all of the US stock market is eventually by all of US households. But when reporting equities held by households, we report only direct equities held by households. Equities via ETF, MF, other funds may be reported separately. Also, a good chunk of equities is owned by foreigners, corporate companies, pension funds, retirement funds, Life insurance companies, etc. For simplicity, Equity+MF component of assets for US households can be assumed to be 70%-80% US Wilshire Cap.
    • Bank Deposits/CDs: All money in banks/CU deposited by US households is $15T. CD and short term investments are $10T, while checkable deposits + currency are $5T. As of 2025, Total deposits in banks is $18T, while in CU, it's $1.8T. This total of $20 is less than $15T reported, maybe because $5T of deposits is not by US households, but by businesses.
    • Bonds (Corporate bonds, US treasuries, Muni Bonds): ~$6T. Bulk of it, $4T, is US Treasuries. However, sifma reports about $11T of corporate bonds outstanding, which doesn't line up with this data, maybe because most of corporate bonds are bought by other business, pension funds, etc.
    • Money market funds: ~$5T
  • Non Financial assets = $56T 
    • Housing market (all houses owned by households): $48T
    • Consumer durable goods (all houses owned by households): $8T. This includes personal items belong to Americans as cars, TV, , personal items, etc.
  • Other assets: $75T
    • Equity in non corporate business => This is to account for millions of Business that are run by Americans, which aren't listed listed on the stock market. Think of gas stations, restaurants, salons, etc that have substantial market value if sold by the owner. If you add this equity, it's ~$15T
    • Pension Entitlement: Millions of Americans are entitled for pensions, either via their government jobs, or by their private employers. This is a big chunk of money at ~$32T, and is included in household assets. Govt pensions are $15T, private is $13T and annuities are $5T.
    • Retirement Plan assets = $26T. These are individual retirement a/c consisting of IRA, 401K, etc.
      • 401K Plans => Total assets were $3T in 2009, but as of 2024, they swelled to $9T.
      • IRA a/c: => Total assets were $5T in 2009, but as of 2024, they swelled to $17T.
  • Total liabilities = $20T. Home mortgage is $14T, consumer credit=$5T, while misc loans are $1T. 
  • Net equity of US households = $200T-$20T=$180T

US wealth (excluding housing) was ~$70T in 2023. 


Wealth:

When it comes to wealth, developed economies have a lot of wealthy people. Though number of Billionaires reported as of 2022 is ~4K or so, I believe there are probably close to 10K billionaires in the world.

Billionaires by Country (US, China and India take top 3 positions)  => https://en.wikipedia.org/wiki/List_of_countries_by_number_of_billionaires

To be in the top 1% of the population in any developed country, you need to have ~$1M in net assets. In USA, you need about $12M to be in the top 1% of households (see in USA section).

Top 1% wealth threshold per country => https://www.msn.com/en-us/money/personalfinance/america-s-richest-1-s-staggering-wealth-and-how-it-compares/ss-AA1fbf0q

Total wealth owned by individuals reached $600T as of 2023. It keeps rising at 5%-10% per year. Total number of millionaires in world is about 100M.

Link => https://www.msn.com/en-us/money/markets/global-household-wealth-declined-in-2022-the-first-dip-since-the-2008-financial-crisis/ar-AA1fjuRf


Clock Gating

Clock Gating is a technique to reduce power on chip. We talked about 2 techniques for reducing power:

  • Clock Gating: This is where we turn clks on/off on different sections of chip as needed. This is what we are going to discuss in this section
  • Power Gating: This is where we turn power  on/off on different sections of chip as needed. Here we get more power saving compared to clock gating as the whole power is turned off. This is implemented via sleep transistors or switches.


History of Clock gating

Most of the flops in design are not actively switching every cycle. By that I mean, data doesn't need to be updated all the times. Data from the driving flops may still get updated, but we don't want data being captured to be updated. There would be some control signal in RTL that achieves this functionlity. In the past, we would have a mux on the capturing flop that would select between new data coming in or recirculating the old dsts on the capturing flop. This could also be called as data gating, as we are gating the data so as not to toggle. This was correct in terms of functionality, but the clk was needlessly toggling on the capture flop. To save even more power, we somehow tie the control signal into the capturing clk. Then the capturing clk doesn't toggle, and hence data is held in the flop to previous value. This eliminates the mux. This results in power saving compared to the mux scheme. This is called clk gating and is used widely and supported by all synthesis tools automatically (you don't have to write RTL for clk gating, it's automatically put in by synthesis tools). The logic structure that we put in the clk path to achieve this is called a clk gater.


Clock Gaters

Clk gaters are special logic cells used to implement clk gating. So, how do we implement clk gaters? Very simple, we just turn clk on or off, so a simple AND or OR gate would do. AND gate is needed when clk is active high, while OR gate is needed for active low clks. However, there is a setup and hold requirement for this "ENABLE" signal, so that the clk pulse is not shortened or glitchy.

FIXME: Digram B-1

From the diagram, we identify 4 cases. In all 4 cases, setup/hold timing need to be met. See all 4 cases below:

Out of the 4 cases, simple AND/OR doesn't work for 2 cases. For those 2 cases, we need to have a latch before the AND/OR gate.


Testability:

Clk gater need to be testable, as they block clk during fucnc mode. So, during scan mode, they can block clk, depending on "EN" signal being 0 or 1.


Car Brake Pad/Rotor change

If you have a regular car, chances are that brake change is one of the things that you have to do once or twice a during the life of the car. Some people keep driving 100K miles w/o needing a brake job, while some might need it sooner. Pads are the first thing to replace, but most mechanics recommend changing both pads and rotors at the same time, as the labor cost is high and part cost is low. So, get it done in one shot, so that you don't have to pay for it again few years down the line. Usually new rotors with new pads are recommended, especially if you are doing this after a long interval (i.e 10 yrs or 100K miles)

Fantastic video showing basics ofhow pads, rotors and calibers work => https://www.youtube.com/watch?v=ivMB4WEGgZo

Get your brakes evaluated every year or so to find out if they need replacement. All shops do the evaluation for free. Take pics while they are evaluating and and take it to different mechanics. This will give you an idea of what all needs to be replaced, Get a quote from each place. Once you are convinced that brake needs replacement, you can either do it yourself or at a mechanic's shop. I'll list both options below:

1. At a shop: The labor cost for replacing brake pads and rotors usually runs from $50 to $100 per wheel depending on the car. For 4 wheels, labor is around 3 hrs, and they will charge you around $200-$400. The cost of pads + rotors is around $400. Total quoted for my Toyota minivan was $1500 for all 4 wheels for pads+rotor. They will push you to change both pads and rotors. Very rarely will they agree to just change the pad. Also, they won't allow you to use your own pads and rotors. Their pads and rotors are the cheapest ones that they get in bulk from the auto parts stores.

Brake specialty places like brakeCheck, etc are also ripoff. All these repair shops basically milk you in parts as well as labor (parts are usually 2X-3X more expensive at these repair shops compared to what you can get at amazon)

2. Do it yourself (DIY): Of course you are here on this website to save money, so we do everything humanly possible ourselves. Brake change is such an easy job, that it can be done yourself. If you just do brakepads, they can be done  in less than 1 hr per wheel in your parking space. It not only saves you money but you put the best parts too. You should spread doing the brake job for 4 wheels over 2 weekends. One weekend do the front brakes and the next weekend, do the rear ones. The rear ones are usually harder. Doing the front ones will give you some experience, and you can also try them out over a week. Next week it gets easier when doing rear wheels

General procedure on brake pad/rotor replacement (3 part series): Part 1 (other 2 parts are in links in the first part) => https://www.youtube.com/watch?v=mwEOP9Tobw8


When to do a Brake Change:

It's hard to know when to get brake work done, and what all parts to replace. Brake pads and Brake rotors are the 2 parts that usually need changing. How long they last depend on the quality of brake pads and rotors that are installed on your car. Bosch Brake pads and rotors are the best and even better than or as good as OEM parts for half the price.

  • Brake Pads: These are the parts that push against the rotor and stop your car. They start thinning out every time brake is applied. New brake pads are about 12mm-15mm in depth. Brake pads need replacement when they go to 3mm or less. This can happen in anywhere from 30K-80K. It's independent of how many years the car has been driven, but mostly on miles driven, and how hard you apply your brakes. Some people have their pads lasting 100K+ miles.
  • Brake Rotors: These rotors are circular disc attached to the transmission that the brake pads press against to stop the car. These also start degrading and thinning out over time. Experts say that the rotors last for at least 2 pad changes. That means, you can skip rotor change the first time you change your brake pads. The next time you replace your brake pads, you can replace rotors too. Since brake pads last from 30K-80K miles, rotors will need change at 60K-160K miles. Auto shops will push you for a rotor change. I changed my brake pads at 65K miles. They could have easily run for 10K miles more. Rotor was in pristine condition. Rotor may not need to be changed even at 150K miles. Car will expire before the rotors expire.


Items needed for Brake Change:

Get these things before you start doing oil change. These are one time investment, and can be reused.

1. Brake Pads and Rotors: You need to buy pads and rotors. Rotors are only needed if they have gotten bad. I got my set of Bosch rotors from amazon for $60 ($40 for front wheels, $20 for rear wheels). Pads come in set of 4, so that you can replace pads in both tires (right and left). Bosch rotors were $80 a piece, so would cost $300. So, rotors are 4X more expensive than pads, that's why people try to postpone changing rotors.

2. Jack and pair of Jack Stand: You need a jack to lift the car (usually avilable with spare tire that's already there in your car). Pair of Jack stands are needed to hold the car for extra safety.

3. Brake Lube and Brake Cleaner: Brake lube and Brake cleaner are good to have.

4. Misc items to rent: You can get these on rent at any Auto parts store for FREE. Do not waste money buying them.


Steps:

Lot of videos on youtube for all common models of cars. Search for your model and follow the procedure exactly as shown.

Video on replacing front brake pads only on Toyota Sienna => https://www.youtube.com/watch?v=bSIh1PzSpo8

Video on replacing rear brake pads only on Toyota Sienna => https://www.youtube.com/watch?v=c2OG_hffd1o

Videos on replacing both pad and rotor replacement on front wheel):

Sequence to take parts out is : Wheels => Calipers => Pads => Brackets => Rotors. Now reverse the order when assembling these back.

Summarized steps:

FRONT BRAKES:

  1. Park your car and get your Parking brake (special brake on the side or near the brakes) so that the car won't move, no matter what. It locks the wheels completely. Now, look at the level of brake fluid under the hood to make sure it's close to MIN level. If the pads are worn out, and the brake fluid level is near the max, then it's possible that after putting the new brake pads, the brake fluid may come gushing out. To prevent that, take some brake fluid out to take it to MIN level. Do this before you start the brake job. For me, the brake fluid was just below the "Max" level, and after he brake job, it went just over the "Max" level. This was just with front 2 brake pad change.
  2. Use 21mm socket with the breaker bar to loosen wheel nuts. Instead of breaker bar with 21mm socket, use "Automotive cross bar" listed above. Do it for 2 front wheels, and then raise the car using jack stands. Now loosen the nuts completely to take off the front wheels.
  3. You will now see your brake assembly. To work on front pads in a easier way, get on the car, and turn the steering wheel so that the pad is more visible to you. For the other side, again turn the steering wheel in completely opposite direction. After taking the wheels out, you will see 2 wishbone springs. Take them out by hand and remember to put them back in (They provide new ones with brake pads, so use new ones if available)
  4. Now take 17mm wrench and 14mm socket (attached to the ratchet) to unscrew the bolt that goes into the side holding the caliper. To unscrew, you need to turn the bolt "counterclockwise" looking into the bolt. To put it back, you need to turn it "clockwise" looking into the bolt. It's easy to do it other way, as you are looking at it from behind the nut, so directions get messed up. Even some videos will appear like they are moving nuts in wrong direction, but they are not. If you are moving it, and nut doesn't seem to move, you need to reverse direction. I did this mistake too. Also, the 17 mm wrench need to be thin (NOT thick), as then it won't go into the small space that's there. So, get different thickness 17mm wrench before you start the job. I had three 17mm wrench, and only one of them was able to go in the limited space available there. We need to take out this caliper before we can access the pads, as the caliper is covering the pads. When lifting the calipers, make sure that you don't stress out the brake fluid line or let it hanging by itself, as any kink in that will cause big trouble and total replacement. If you are not comfortable, just unscrew the bottom bolt and leave the top bolt in place, but loosen it a bit. This will allow you to keep caliper in place and still change the pads. You can get away with this only if you are changing pads ONLY. IF changing the rotor too, then you will need to unscrew both top and bottom nuts. Leaving the top nut in place will prevent any damage to the brake fluid pipe, as the pipe is never hanging. Put the caliper on the top where it has support and be very careful with the brake fluid line. If you do take bot nuts off, hang it using the "Brake Caliper Hanger".
    1. NOTE: The caliper may sometimes seem too tight, and refuse to budge. This is because the pistons in the calipers are pushing against the pads, making it difficult to move. Don't try to force it out. Watch videos on how to loosen the caliper using a screwdriver or other pointed tool. Many novice DIYers end up destroying their caliper thinking it's stuck.
    2. IMP: Turn the bolt counterclockwise to unscrew it, as explained above.
  5. Once the caliper is resting on some solid surface on the car, push the pistons back to be flush with the housing. You will need Brake pad spreader to do that. You might need to take out both brake pads to assist you with this job. Toyota sienna is a twin piston, so you will 2 holes. Many cars are single piston, doesn't matter for our purpose.
    1. Make sure no brake fluid is behind the duct seal.
    2. When you push the pistons in using C-caliper or brake pad spreader, you will notice brake fluid rising in the container under the hood. This is why we reduced the brake fluid level in step 1 above.
  6. OPTIONAL (Rotor Replacement) If you need to replace rotor, watch video on how to take old rotor out. Replace them with new rotor.
    1. To take rotor out, we have to first detach the bracket from the car, since it's covering the rotor. The bracket has two 17mm nuts on the back side, which need to be unscrewed.
    2. Then you can take the brake rotor out and put the new brake rotor. Then screw the bracket back in. You need to toque the screws to 76 ft-lb. See the videos above.
  7. Use brake cleaning liquid to clean areas around caliper, brake pads, rotors, etc.
  8. OPTIONAL: Now pull the side pins in rubber boot out and clean them. Apply lube and put both pins back. Make sure they go in the rubber boot completely, as they were before you took them out. People do it, I didn't think it was necessary.
  9. Get new brake pads, and install the wear indicator on top of each brake pad. It should make a clicking sounf when inserted completely, as there's a notch on pad where it gets inserted in. On the brake housing itself, remove the old brake slide pins, and replace it with new ones after cleaning the surface with brake cleaning liquid. Put a dab of brake lube on each piece. Also put the lube on back side of each brake pad.
  10. Install the brake pad on new fitting kit (you my use the old fitting kit, but if you got new ones with the new pads, use the new ones). Put the caliper back and tighten the caliper bolts to 25 ft-lb using the same 17mm wrench and 14mm socket.
  11. Finally put the wheels back. Tighten the wheel nuts a bit while car is lifted. Repeat the whole process for other wheel in the front. Then bring the car down on the ground and tighten both wheels to 76 ft-lb.
  12. Before you drive the car, turn it on, and press the brake pedal a few times to build the pressure. Do NOT put the car into any gear (leave it in PARK). Only once the pressure is built, you should take a test drive. I pressed it 5-10 times, which was good enough. Do NOT forget to put your car out of "Emergency Parking" (the thing we did in step 1)
  13. Now do the rear brakes. They are slightly more difficult than front ones, but process is the same.


REAR BRAKES:

  1. Do your rear brakes after test driving with your front brakes replaced. Rear brakes turned out to be much easier than front.Rear wheels don't turn with Steering wheel, so nothing to be done. Take the wheels out and then take the calipers out.
  2. There is no wishbone spring. Even the nuts on calipers only require 14 mm wrench to open (no 17mm wrench or 14 mm socket needed), as only 14mm nut moves. Just a little counter clockwise push, and it will loosen.
  3. Once loosened, open it. There is no place to hang the calipers, so have someone hold it by hand, while you are replacing the pads. Steps exactly the same. Do NOT forget to install the wear indicator on the bottom of the pad.
  4. Most of the other steps same as Front brakes.


Front brake will take time, if you are doing it for the first time. Maybe an hour to 2 hours. Rear brakes will take at most an hour. All in all, 3hrs is the most you will need on changing pads on all 4 wheels. Congrats on learning a new skill and a job well done !!